Stable cell line development is the foundation of scalable, consistent antibody manufacturing. Yet it is also one of the most misunderstood timelines in biopharmaceutical development — programs routinely slip because sponsors underestimate how many steps are involved, how long stability testing takes, and how failures at late stages can reset the clock entirely. This guide walks through every stage, gives realistic timelines, and explains how modern platforms like CRISPR site-specific integration compress the schedule without cutting corners.
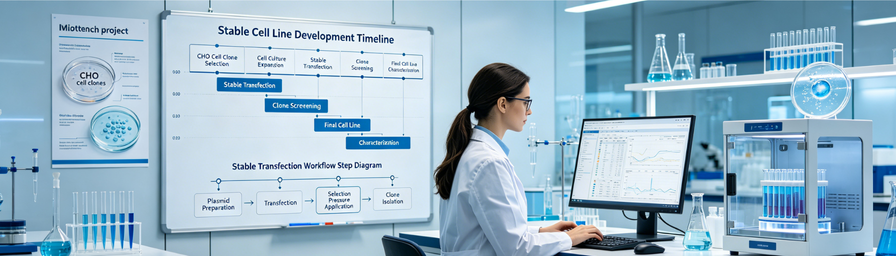
Stable cell line development is the process of creating a host cell — typically Chinese hamster ovary (CHO) — that permanently and consistently expresses your antibody or recombinant protein of interest. Unlike transient expression, where the expression vector is not integrated into the genome and is lost after a few cell divisions, stable integration makes the antibody gene a permanent part of the cell's genome. The resulting cell line can be banked, thawed, and used to produce consistent quantities of antibody across multiple production campaigns over years.
Stable cell lines are required for: clinical-grade antibody production; commercial manufacturing; any program where batch-to-batch consistency is required; and any scale-up beyond a few grams that relies on controlled, reproducible bioprocess conditions.
The process begins with the antibody sequence — typically VH and VL sequences that have been determined by sequencing or AI design. The sequence is codon-optimized for CHO expression and synthesized as a gene fragment, then cloned into the expression vector. The vector contains:
CRISPR approach addition: The sgRNA targeting the safe harbor locus is designed and validated in silico for on-target efficiency and off-target risk at this stage.
The expression vector is introduced into CHO-K1 or CHO-DG44 cells by electroporation or lipofection. For CRISPR integration, Cas9:sgRNA ribonucleoprotein (RNP) complex and the donor vector are co-delivered to cells via electroporation. After transfection, cells are placed under antibiotic selection pressure to eliminate non-transfected cells. Surviving cells form the stable pool — a mixed population of cells that have integrated the transgene at various genomic locations (random integration) or specifically at the target safe harbor (CRISPR).
The stable pool is tested for bulk expression level by ELISA or Protein A quantitation. A pool expressing detectable antibody confirms successful integration and serves as the starting material for single-cell cloning.
The stable pool is diluted to single-cell density and plated into 96-well plates by limiting dilution or FACS-based single-cell sorting. Each well grows from a single cell — ensuring that the resulting clone is genetically homogeneous (monoclonal). Typical numbers:
Clonal outgrowth takes 2–3 weeks. FACS-based sorting platforms (e.g., ClonePix, Berkeley Lights Beacon) accelerate this step by enabling high-throughput secretion assays before expansion.
Expanded clones in 24-well plates are screened for expression level by supernatant ELISA or Protein A-based titer assay. Top-expressing clones (typically top 10–15% by titer) are selected for expansion to 6-well plates and T-flasks. Growth characteristics (doubling time, maximum viable cell density) are also assessed to eliminate clones with poor growth despite high expression.
The top 20–50 clones from primary screening are evaluated in fed-batch mini-cultures (spin tubes or 24-deepwell plates) using a platform fed-batch protocol. This is the first true productivity assessment — specific productivity (qp, in pg/cell/day) and volumetric titer (g/L) are measured at harvest. Integrated viable cell count (IVCC) analysis normalizes titer for growth differences between clones. The top 5–10 clones are selected for stability testing.
This is the longest and most critical stage. ICH Q5D requires demonstration that the production cell line maintains genetic integrity and consistent expression over the number of generations representing a full manufacturing campaign. For most programs, this means 60 continuous passages. Testing involves:
With conventional random integration, 30–50% of initially selected clones fail stability — dropping expression beyond the ±20% threshold. With CRISPR + UCOE technology, >95% of selected clones pass. This single difference accounts for the majority of timeline compression in our stable cell line development service.
The lead stable clone is expanded to generate:
Cell bank release testing follows the 21 CFR 610 / ICH Q5A framework and includes: identity (isoenzyme analysis or STR profiling), sterility, mycoplasma, in-vitro viral testing, and retroviruses (by TEM or co-cultivation). This testing requires 4–8 weeks at a qualified testing laboratory.
The final deliverable includes a full analytical characterization package:
| Stage | Conventional (Random Integration) | CRISPR Site-Specific (AntibodyLLM) |
|---|---|---|
| Vector construction | 2–3 weeks | 2–3 weeks |
| Transfection & pool | 2–3 weeks | 2–3 weeks |
| Single-cell cloning | 3–4 weeks (500+ clones) | 2–3 weeks (50–100 clones) |
| Primary screening | 3–4 weeks | 2–3 weeks |
| Fed-batch ranking | 3–4 weeks | 3–4 weeks |
| Stability testing (60 passages) | 10–12 weeks (30–50% fail) | 10–12 weeks (>95% pass) |
| Cell banking & release | 4–6 weeks | 4–6 weeks |
| Total (first-pass success) | 6–9 months | 3–5 months |
The critical difference: conventional programs that fail stability testing must restart clone selection — adding 3–6 months. With CRISPR + UCOE, this restart scenario is eliminated in >95% of projects.
Our stable cell line development service delivers a fully characterized, GMP-ready CHO working cell bank using CRISPR site-specific integration + UCOE technology. Key deliverables include:
The CRISPR CHO platform underlying our service has been validated across antibody formats including IgG1, IgG4, bispecifics, Fc-fusions, and nanobody-Fc constructs.
Understanding the stable cell line development timeline in detail is the first step to avoiding the delays that derail programs. Whether your timeline is urgent or standard, AntibodyLLM's CRISPR-based platform gives you the fastest, most reliable path from sequence to production-ready cell bank.
Get a production-ready CHO stable cell line in 3–5 months. Tell us your sequence and timeline.
Request a Quote